The M Likes

Monday, February 18, 2019

Homemade pizza... never buy delivery or frozen again!

February 18, 2019 2
Homemade pizza... never buy delivery or frozen again!

I absolutely love PIZZA and have all my life but I never tried making it at home from complete scratch. Of course I've tried pre-made crusts and even "fresh" dough from the grocery store with pizza sauce jars but those options were just ok. So what changed? I recently got a stand mixer again and decided I would try making some pizza dough. I've tried making a few recipes out over the last month but I found a winner and want to share it with yall. During my month of trying out dough recipes, I also found a new cooking method, better ways of rolling out the dough, and an easy pizza sauce way better than those small jars of pizza sauce. I should make a video of the complete process but for now I will link the videos that inspired me to be a better pizza maker. Did I mention that it is extremely easy to do all this?! Well it is and totally worth it over frozen or delivery pizza from the big chains. Try this out and let me know how it goes for you!

The Dough

After trying a few dough recipes out, I've decided that Bobby Flay's recipe is my favorite so far and friend approved. I didn't modify a thing to his recipe, so go check out the recipe: here. I usually divided the risen dough in half or thirds.

Now rolling out the dough into a perfect circle took some practice as the first few weeks I had some very "rustic" shaped pizzas. I recently watched a video and it definitely improved my technique, but I am still working up to tossing the dough up in the air. Check out the video: here.

Dough right after mixing with olive oil rubbed on it.
1 hour after rising. Double in size and ready to use.
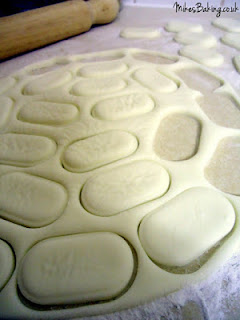
Rolled out and ready to go!

The Sauce

The sauce is simple, makes a lot, and better than those little jars of pizza sauce. All you need is 3 basic ingredients then add in optional flavors you like.
Here's what you need:
  • 28 oz crushed tomatoes (I buy the Red Gold brand)
  • 6 to 8 garlic cloves, minced
  • Sea salt, to taste (I didn't measure this out but used probably close to a teaspoon... or 2)
Some optional things I've added: crushed red pepper flakes, EVOO, basil... I've made this a few times now and tried different extras each time. Add in what you like to enhance the basic sauce

Mix it all up and it makes enough sauce for approximately 5 to 6 pizzas!

The Method

This method was new to me and I saw it on a Frankie Celenza video. Super easy and it takes less then 10 minutes!
Here are the steps:
     1. Heat up your large cast iron pan on the stove top over medium heat
     2. Throw the rolled out pizza dough into the pan
     3. Top with 3 to 4 tablespoons of sauce and spread it out
     4. Load up your favorite toppings
     5. Check that the bottom of the crust has turned golden brown with char-grilled spots
     6. Take the pan and put right under your broiler until the cheese is bubbling away
     7. Take out of the pan and let cool for a couple minutes and then slice it up
     8. Enjoy!

The Toppings

Of course I did the classic toppings but have also tried out some unusual toppings. I plan on trying out more and I'll share the really good ones on here. Check back later for some topping ideas!


Tuesday, January 1, 2019

Thai Bubble Tea: Make it at home!

January 01, 2019 1
Thai Bubble Tea: Make it at home!

I absolutely love BUBBLE TEA and THAI TEA! I might have an addiction, if we are out and I see either one I usually order some. The problem I've had is that I can't find them close to my house, so they have just been treats every so often. When we lived in the UK, I usually got them on trips to London, and now in the US it is whenever I happen to drive by and see a bubble tea cafe. I also haven't really found a Thai restaurant that I love here yet, so I've been missing Thai tea. That is until I did a little research, taste testing, and found the right Thai tea and tapioca pearls for the bubble tea. Not only is it super easy to make at home but the Thai tea tastes exactly like the kind in the restaurants and the tapioca pearls are better than some I've had from the cafes. Plus this way my addiction is a little kinder to my wallet. Get the supplies and start making Thai Bubble Tea at home!

Recommended supplies to order before you try making this at home!

Nuts.com - 1lb of Tapioca Pearls ($4.99)


Thai Bubble Tea Recipe:

Ingredients for 4 people:

Steps:

  • 1 cup Pantai Thai Tea
  • 5 cups Filtered Water
  • 3/4 cup Sugar
  • 1 cup Tapioca Pearls
  • Honey or your choice of sweetener
  • Half and Half
1. Thai Tea:  Pour 1 cup of thai tea into large thai tea filter and set aside. In a medium saucepan, bring the water and sugar to boil and then slowly dip in the tea filter until the leaves are all wet. Be careful not to let the opening of the filter to touch the water. Let the tea boil for 5 minutes and then remove from heat and continue to steep the tea for 30+ minutes. Remove tea filter and squeeze out remaining liquid with tongs. Place into a sealed container (water bottle) and place in the fridge to cool.
2. Bubbles: Follow the directions on the package for the tapioca pearls purchased. The Nuts.com pearls only really need 30 minutes to boil and then 30 minutes to sit in the hot water off of the heat. Rinse with warm water and place in a small container to then add your sweetener. I usually add a tablespoon of honey.
3. THAI BUBBLE TEA:  Spoon the pearls into the bottom of your glass and then add ice about over halfway up the cup. Then add in your Thai tea and save room to add in desired amount of half and half.
4. ENJOY!


Enjoy your Thai Bubble Tea!!


Sunday, December 23, 2018

Easy Homemade Peppermint Creams

December 23, 2018 1
Easy Homemade Peppermint Creams

Okay, this is a re-post from my old blog but it was one of the most popular and visited posts, so I wanted to share it on here in time for the holidays. The recipe comes from Lorraine Pascale, a British chef that we used to watch over in the UK on the BBC but she has also moved over to the States. I need to check out the latest food shows she is featured on... Anyway, this simple recipe was from her Baking Made Easy series and is a great addition for Christmas, New Year's, or whatever party you may be having this holiday season.

Now before I get into the recipe, I want to push one thing that doesn't seem very popular here in the States yet but it totally should be... and that is a kitchen weighing scale. I have a digital scale and there are tons of options to choose from on Amazon. I still have a lot of books from the UK listing amounts in weight measurements and I wish more books in the States had the same as it is definitely more accurate for baking. So I was going to convert this recipe from grams to cups but I'm not sure how accurate the online conversions are to use in recipes. For example, 300g powdered sugar is approximately 1.58305 US cups... and if I round that to 1 and half cups I'm not sure how that would affect the recipe. My advice is go buy a digital scale and find recipes that have weight measurements. Here is one of my absolute favorite recipe books to start you off, The Hummingbird Bakery: Cake Days. The Hummingbird Bakery started in London and I just loved their cupcakes and their recipes to make at home always turned out great! OK on to the recipe!

Peppermint Creams Recipe

Ingredients:

Steps:

  • 300g Powdered Sugar
  • 125g Condensed Milk
  • 1/2 tsp Peppermint Extract
  • 100g Dark Chocolate
1. MIX together the powdered sugar, condensed milk, and peppermint extract until everything has combined and you can make a ball out of the ingredients.
2. DUST your work surface with some icing sugar, and roll out until it is about 3-5mm thick. Use a pastry cutter to create discs of peppermint creams and place on a tray lined with baking paper.
3. MELT the chocolate and dip the discs halfway into the chocolate and place back on the tray to set or drizzle chocolate all over them.
4. ENJOY!


Sunday, December 9, 2018

MeUndies: You got to try these out!

December 09, 2018 0
MeUndies: You got to try these out!

Have you heard of MeUndies?


I discovered MeUndies earlier this year when I was bored in my hotel room for a work trip and decided to do a little retail therapy. After checking them out, their fun prints/patterns/colors and claims of super soft undies got me interested in trying this new brand. I decided to go ahead and buy a pair to see if they truly were as comfortable as they claimed. Okkkkk... they weren't lying these undies are super soft and comfortable, where I don't even really notice them on which is a good thing. I've liked them so much that I got the monthly membership to slowly replace my other undies. They got plenty to offer on there with different cuts and styles available individually, packs, or monthly membership. If you are looking to upgrade your undies, check out what MeUndies offers and get 20% off with this link. Try them out and let me know what you think!


Saturday, November 24, 2018

I tried making a Tastemade recipe... Fudge Brownie Crust Pecan Pie!

November 24, 2018 0
I tried making a Tastemade recipe... Fudge Brownie Crust Pecan Pie!

Happy Saturday after the Thanksgiving holiday! I hope everyone has recovered from their food comas and enjoyed the holiday. I wanted to share with you a new recipe I tried from Tastemade. I saw the quick 1 minute video shared by a friend and wanted to try it out as it looked super easy. It was actually pretty straightforward to make but not as easy as the video made it seem. The only part I had issues with really was the brownie crust as Tastemade's recipe could have shared the brownie brand they used or even come up with their own brownie recipe to make it easier for their readers around the world. Also, the video had amounts of ingredients to add to the brownie mix but the recipe below said follow the brownie box recipe but then gives specific baking times... so a little confusing there. 

Simply put... my brownie crust did not come out like shown in the video, so I tried my best to save it with extra pressing into the pie dish and cooking time. However, I thought the filling was extremely easy to make and very yummy, plus no corn syrup! Overall, I was able to put it all together and bring it to a friend's house for Thanksgiving... it was good but very rich with the brownie and filling combo. Also, with all the food we ate throughout the day by the time we got to the pies it was a struggle to eat more food. Now I have half a pie to finish off... challenge accepted though! 

Give this recipe a try for one of your upcoming holiday parties! If anyone figures out the right brownie mix or proper ingredient ratio to use for a crust, please let me know... I would like to try making it again! Here's the recipe link: https://www.tastemade.com/shows/hor/fudge-brownie-crust-pecan-pie.

Check out their video recipe:

Sunday, November 18, 2018

DIY Wall-Mount TV Plug Relocation

November 18, 2018 3
DIY Wall-Mount TV Plug Relocation

Cut the clutter and save yourself some serious money!


I recently moved into a new home, and out of necessity had to mount my TV on the wall. I do like the look, but hated the fact that the power cords had to stretch to the bottom outlet. Although it may seem like a daunting task to relocate or add a new plug behind the TV, I assure you it isn't! Follow the steps below to get it done!


Tools you'll need:

  • Utility Knife
  • Wire Strippers 
  • Drywall Knife
  • Stud Finder
  • Small Level
  • Screwdriver

Hardware:

  • (1) Duplex Outlet
  • (1) Face Plate
  • (1) Single Gange Outlet Box (Clamp Style)
  • 6' - 8' ROMEX 15amp wire (double or triple strand w/ ground)

Tools you'll want:

  • Electricians Fish Tape
  • Electric Drill
  • AC Voltage Probe

Step 1: Assess your setup

My TV was already mounted on the wall. So laying out where the wall box had to go was pretty simple. In order for this to work, your TV must cover the same stud cavity as the current outlet. In the picture the green lines are the studs, and the light orange is where you should have open space.

WARNING! Make sure there are no horizontal studs across your wall before starting! If there are, then you'll need to re-attack this project.

TIP: use your stud finder to locate both the horizontal and vertical studs


Step 2: Layout the location

The best spot for you outlet is going to depend on the TV size and shape. Mine has a large lump on the lower half, so to accommodate larger plugs I chose to put it higher on the wall. Take your outlet box and use the level to position the box. Then trace an outline with a pencil.

Tracing box. NOTE: Don't include the tabs on the top and bottom. They hold the box during installation.

Leveling the box

Step 3: Make the cut!

Now things are getting scary! Your about to cut a big ole hole in a perfectly good wall. Dont fret, patching drywall is pretty easy so although a mistake here would stink, its not the end of the world.

If your stud-finder has wire sensing capabilities, take a second here to verify that there are no wires behind this area.

Take your drywall knife and carefully cut out the your tracing.


Step 4: TURN OFF THE POWER!

Yes, this gets its own step. Don't be that guy or gal who fry's themselves doing a simple diy project! Locate your breaker box and turn off power to the outlet you will be working with. I like to use a cheap AV voltage probe to ensure the circuit is dead, but a lamp, fan, or anything you can plug in will also work. 


Step 5: Remove outlet

Your about halfway there at this point! Go ahead and remove the face-plate and actual Outlet from the wall box. Dont take any wires off, just pull it out a ways and put it aside.

If you look up inside the box, you'll see I have two ROMEX lines coming in. The upper right hole is where I will be running the new line.


Step 6: Go fishing

Now is when you will regret not having an electricians fish-tape on hand. This step is possible to complete without it, but I promise it will be a huge pain in your a#@.

Take the tape and shove it through one off the access holes in the wall box, then navigate it up the wall to your freshly cut hole. (This is where the horizontal stud would be an issue, you wouldn't be able to get the wire past it). Be patient as the insulation in the wall can make this a bit challenging. Also don't be afraid to stick your hand in the upper hole and feel for the tape with your fingers.

If you chose to do it with the ROMEX and not the tape, the process will be the same.
If your superman and manage to do this with the actual ROMEX then congrats! You can move on to the next step. For us mortals, we now need to pull the ROMEX back the way we came. To do this, use some electrical tape to secure the ROMEX to the fish-tape end. Carefully pull it back through the wall and into your lower outlet box.


Running the tape.

Success! Tape is through.

Step 7: Prep Wires for Lower Outlet

Alright time to start stripping. Woe now, keep your clothes on! I'm talking about wire stripping. You'll want to pull about a foot of ROMEX through the hole, and then use your utility knife to cut back the sheathing. Leave about an inch protruding into the wall box for code compliance.

Take your wire strippers and remove about 1/2" from the ends of the black and white wires. You can fold up the red wire and tuck it away (it isn't used in this setup)


Step 8: Connect to Lower Outlet

How this step works for you will depend on the type of outlet you have. Most construction from the last 15 years will have a setup as shown. On the back of the outlet you will see a small hole on both the black and white sides. Simply push the stripped wire ends into their corresponding holes.

White to white and black to black.

Twist the grounds together with the others in the box.
 

To finish, bend all the wires in an "S" shape to stuff them back in the wall. You can also go ahead and re-install the outlet and face-plate at this point.


Step 9: Install Upper Outlet Box

Now we will need to repeat the same steps for the upper box as we just did for the lower.

First pull about a foot of ROMEX a bottom access hole, then push the box into the wall. Don't be afraid to use a little force.

This is where using the tabbed type model is nice. All we have to do is turn the clamping screws on the top and bottom to secure the unit. Save your wrists and use an electric drill if you have one!

At this point I have also cut back the ROMEX sheathing, and stripped the wires, as we did in step 8.

Be sure to leave 1" of sheathing just as before.

To actually wire up the outlet, I used the traditional mounting poles on the side of the unit. You can just push the wires into the holes like we did before, which makes the process easier.

The pole mounting method requires you to bend a "C" shape into the stripped part of the wire. This is show zoomed in in the photo. It is considered good practice to pinch the loop closed around the pole screw.

Finish the hookup by repeating the process for all the wires.

With that your pretty much done! Bend the wires into an "S" shape as before and stuff them into the wall box. Then your clear to install the outlet and face-plate.


WooHoo!! Your done! Go back out to the breaker panel and restore power to the circuit. Test it with your voltage probe or small appliance of choice.
 

Finish Up

Congrats on pulling this off! I would like to point out one small concern. Since we added another branch to an existing circuit run, you do pose the risk of overloading it. The chance of this happening is quite small because new TVs draw a comparable little amount of power, but if you find yourself popping the breaker that's why.

Feel free to post comments or questions if you get stuck somewhere.

Cake Batter Fudge: Easy Peasy!

November 18, 2018 0
Cake Batter Fudge: Easy Peasy!

I love fudge but stay away from the recipes where you have to use a candy thermometer, I like the easy recipes! One of these days I will try fudge making that way, once I get around to actually buying a candy thermometer. For now, here is a simple recipe I first saw on Pinterest and then on one of those Pinterest fail sites. I love cake batter anything, so had to try this recipe out. I was worried it would come out looking more like the failed version, which they described as "meat colored fudge", gross! I learned from their failure to add the sprinkles in at the last minute with minimal mixing in, which the original recipe does mention as well, so very important step. Use whatever cake mix you can find in the shops, I want to try out a chocolate version! This fudge is amazingly yummy!! It is very sweet and initially I thought one square was enough for a little treat but I found myself going back for more and more.

Try out this super easy and yummy recipe @ Baked from a Box: Cake Batter Fudge.


**** MikesBaking.co.uk was my first venture in blogging 
and is no longer active but more posts can be found here. ****